
I failed to post an update on those pesky open-back bezels from my last entry. Here was the problem:
I tried pouring resin into a few open-back bezels. Based on advice, I pressed clear contact paper to one side (we’ll call it the “back”) of the bezel, making sure it adhered fully to the edges so no resin would leak out. The pouring went fine and the front came out great, but when I peeled the contact paper off, I was left with a fogginess on the back side which resembled a residue, though had no texture.
I tried Goo Gone. I tried a gentle buffing with fine grit sandpaper. No luck. I shoulda taken a picture at this stage, but I didn’t.
I asked a friend who’s worked with resin. Although she’d never poured open-back bezels, she’d heard that painting another coat of resin over the first should clear it up. She’d also heard that sandpaper was always a bad idea! So file that away for future reference… ![]()
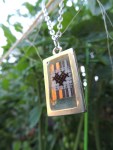
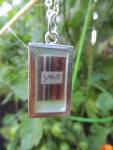
I applied another thin layer of resin. Here’s the result on of the open-back bezels after the second pour from the front (heart) and back (“yes”). The fogginess is much less noticeable indoors than it is here in the sunshine.
I have found that the resin dries hard to everything except plastic. If you tape a plastic trash bag or ziploc bag to your work station, any resin spills will peel right up. So what I’m thinking for the next batch is this: cut a tiny square or rectangle of plastic and fit it to the contact paper where it would otherwise touch the resin. Stay tuned for stories of success or failure…
